Core
Getting Started
As part of the Getting Started guide, we’ll set up a filtering DNS server that you can control from the admin app. We’ll set up DNS servers on both kubernetes and individual servers. We won’t add per-user or per-device filtering yet. This kind of setup can still be quite useful - for example, you could use it to block traffic across your whole network, or use DHCP to set up static filtering for a sub-set of users using Safe Surfer’s central domain database. This guide is also a prerequisite for the next ones.
Although you can run Safe Surfer DNS on servers (VMs or bare metal), the other apps run inside Kubernetes.
So you’ll need to have access to a kubernetes cluster before proceeding, for example:
- EKS (AWS)
- AKS (Microsoft Azure)
- GKE (Google Cloud)
- Kind (Run locally, not for production)
- Minikube (Run locally, not for production)
- Any other Kubernetes distribution, e.g. openstack
If you’ll be running DNS in the cluster, you should make a public cluster, not a private one. In a public cluster, each node has its own public IP address with which to access the internet directly. Without this, you’ll be using NAT, which can be a performance bottleneck for DNS servers.
You will also need to install Helm, the package manager for Kubernetes.
Once Helm is up and running, add the Safe Surfer repo:
helm repo add safesurfer https://safe-surfer.github.io/Core
Next, create a values.yaml file in the directory of your choosing. Add your image pull secret at the beginning of the file:
imagePullSecret:
  username: username
  password: password
  email: test@example.com
You can contact us at info@safesurfer.io for a free pull key for demo purposes.
This will allow kubernetes to pull images from our container registry.
Setting up a database
Safe Surfer needs a postgresql database to store persistent data. The chart supports two different ways of connecting to one:
- Provide connection/login details to any existing postgres database. You can easily set one up on any major cloud provider. Versions 11+ are supported.
- Generate manifests for postgres-operator, which will create a new postgres database cluster for you. Safe Surfer then automatically connects to it. This is great for testing, since it works in kind/minikube, but also suitable for production. Be warned though, all data may be lost when you uninstall the chart, which is not true for the above option. This option also makes it more difficult to migrate to a different cluster without downtime.
Existing database
To use an existing database, add the connection details to your values.yaml. You may want to create a new database and user for the Safe Surfer deployment.
db:
  inCluster:
    enabled: false
  external:
    enabled: true
    pguser: safesurfer
    pgpassword: safesurfer
    pghost: 10.10.10.10
    pgdb: safesurfer
    pgsslmode: require
Now just deploy the chart - if everything is configured correctly, the new release will run migrations to create tables in the database:
helm install "safesurfer" "safesurfer/safesurfer" -f values.yaml
View the pods using kubectl get pods until it looks something like this:
NAME                                        READY   STATUS      RESTARTS   AGE
safesurfer-db-migrations-ncjofiwvgw-4hbnz   0/1     Completed   0          25s
Troubleshooting:
- If the migrations pod takes a long time or errors, you can see what’s happening by running
kubectl logs $MIGRATIONS_PODwhere$MIGRATIONS_PODis the name of the migrations pod above. - If you get a log like
The current migration state is dirty: please fix manually then retry., then likely an earlier job will contain the actual error. Try to find the oldest migrations pod and view its logs instead. - Migrations will fail if the database version isn’t at least 11.
In-cluster database
To use an in-cluster database (recommended if you’re testing using kind/minikube), first install postgres operator. This example deploys it to the postgres-operator namespace.
kubectl create namespace "postgres-operator"
helm repo add "postgres-operator-charts" "https://opensource.zalando.com/postgres-operator/charts/postgres-operator"
helm -n postgres-operator install "postgres-operator" "postgres-operator-charts/postgres-operator"
Run kubectl --namespace=postgres-operator get pods -l "app.kubernetes.io/name=postgres-operator" until you see that postgres operator is running:
NAME                                 READY   STATUS    RESTARTS   AGE
postgres-operator-664dbb4997-v6gkm   1/1     Running   0          42s
Now add the following to your values.yaml to enable the in-cluster database:
db:
  inCluster:
    ## Tone down the resources so this fits locally - readjust for production
    cpuRequest: "10m"
    memoryRequest: "256Mi"
    cpuLimit: "1"
    memoryLimit: "512Mi"
    volume:
      size: 4Gi
    connectionPooler:
      cpuRequest: 10m
      memoryRequest: 16Mi
      cpuLimit: 100m
      memoryLimit: 32Mi
Now just install the chart - if everything is configured correctly, a new database cluster will be created, a user/database created within, and finally a job will be created to bring up the database tables.
helm install "safesurfer" "safesurfer/safesurfer" -f values.yaml
View the pods using kubectl get pods until it looks something like this:
NAME                                        READY   STATUS      RESTARTS   AGE
safesurfer-db-0                             1/1     Running     0          2m43s
safesurfer-db-1                             1/1     Running     0          91s
safesurfer-db-migrations-tlfo7inizf-hjkz6   0/1     Completed   0          2m44s
safesurfer-db-pooler-59cc88bd45-shmkt       1/1     Running     0          37s
safesurfer-db-pooler-59cc88bd45-tsr82       1/1     Running     0          37s
Once the migrations pod has Completed, you’re ready to start enabling other features of the Safe Surfer deployment.
Troubleshooting
- To create the database, the kubernetes nodes must download a few container images. If the connection speed is low, it may take too long to create the database, which will cause the migrations pod to fail. In this case, you can wait for the database to create successfully, then deploy again using
helm upgrade "safesurfer" "safesurfer/safesurfer" -f values.yaml. - If pods are stuck
Pending, you may need to lower the resource requirements in yourvalues.yamlfurther.
Setting up the admin app
Now that we’ve got a database, the next thing we’ll set up is the admin app. This is a GUI and API that we’ll use to add some categories and domains. Add the following to your values.yaml:
categorizer:
  adminApp:
    enabled: true
    admin:
      username: admin
      password: generate-a-strong-password
redis:
  enabled: true
Now upgrade the deployment:
helm upgrade "safesurfer" "safesurfer/safesurfer" -f values.yaml
View the pods using kubectl get pods until admin-app and redis are Running:
NAME                                        READY   STATUS      RESTARTS   AGE
safesurfer-admin-app-668964c99c-zknhn       1/1     Running     0          39s
safesurfer-db-migrations-3sjfh2r2xm-l72b9   0/1     Completed   0          39s
safesurfer-redis-0                          1/1     Running     0          39s
It’s normal for the migrations job to run for every deployment. It will not do anything unless the current database migrations
are out of date.
To access the admin app, we have a few options:
- Create an ingress. This is not available when running locally.
- Use port-forwarding. Using this method means anyone wanting to access the admin app needs access to the k8s cluster, which may or may not suit your needs.
Creating an ingress
Follow the guide for setting up an ingress and certs. Then, add an ingress spec to adminApp in your values.yaml like so:
categorizer:
  adminApp:
    # Uncomment below to restrict by source IP
    # authIpWhitelist:
    # - 0.0.0.0/32
    ingress:
      enabled: true
      host: categorizer.ss.example.com
      tls:
        # See the ingress and cert guide
Ensure that you’ve set up a strong password and that a DNS entry exists for the domain that you’ve chosen. Once the certificate and ingress are ready, access the admin app from the domain and enter the username/password.
Using port-forwarding
In a separate terminal, run kubectl port-forward svc/safesurfer-admin-app 8085:8080. Then, you can access the admin app
from http://localhost:8085 in your browser.
Troubleshooting
- Ensure port 8085 is free on your local machine. If not, choose a different port.
- If you have overridden
categorizer.adminApp.svcPort, substitute that for8080. - Port-forwarding won’t work when
authIpWhitelistis enabled.
Using the admin app
The admin app can be used to manage domains, categories, restrictions, IP addresses, users, and anonymized usage data. You can use the GUI, or you can automate tasks using the admin API. In this guide, we will use the GUI to:
- Enforce Safe Search on Google across the whole network
- Create a category containing domains that will be blocked for everyone
- Categorize some other (unblocked) sites.
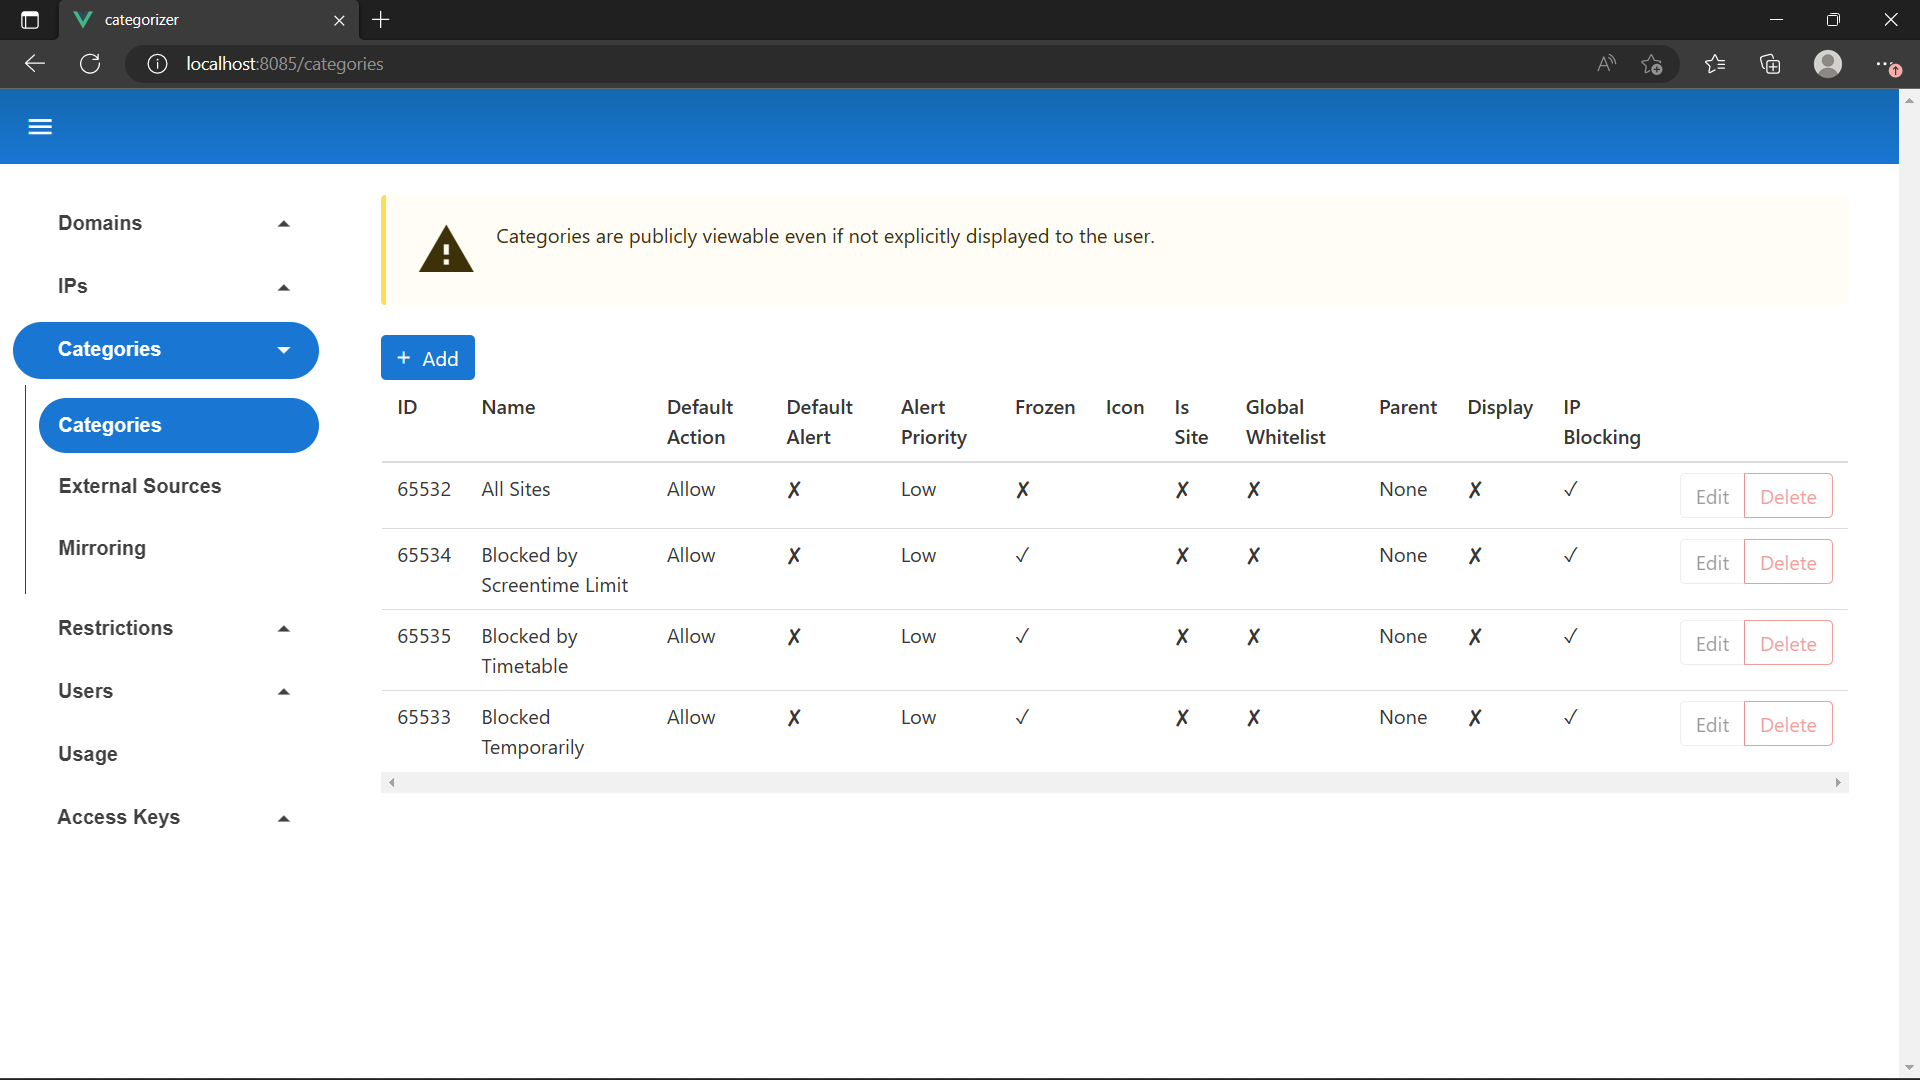
To begin, we will add a few categories. Navigate to the Categories -> Categories page on the side menu. It should look something like this:
Add a new category. Enter the following details:
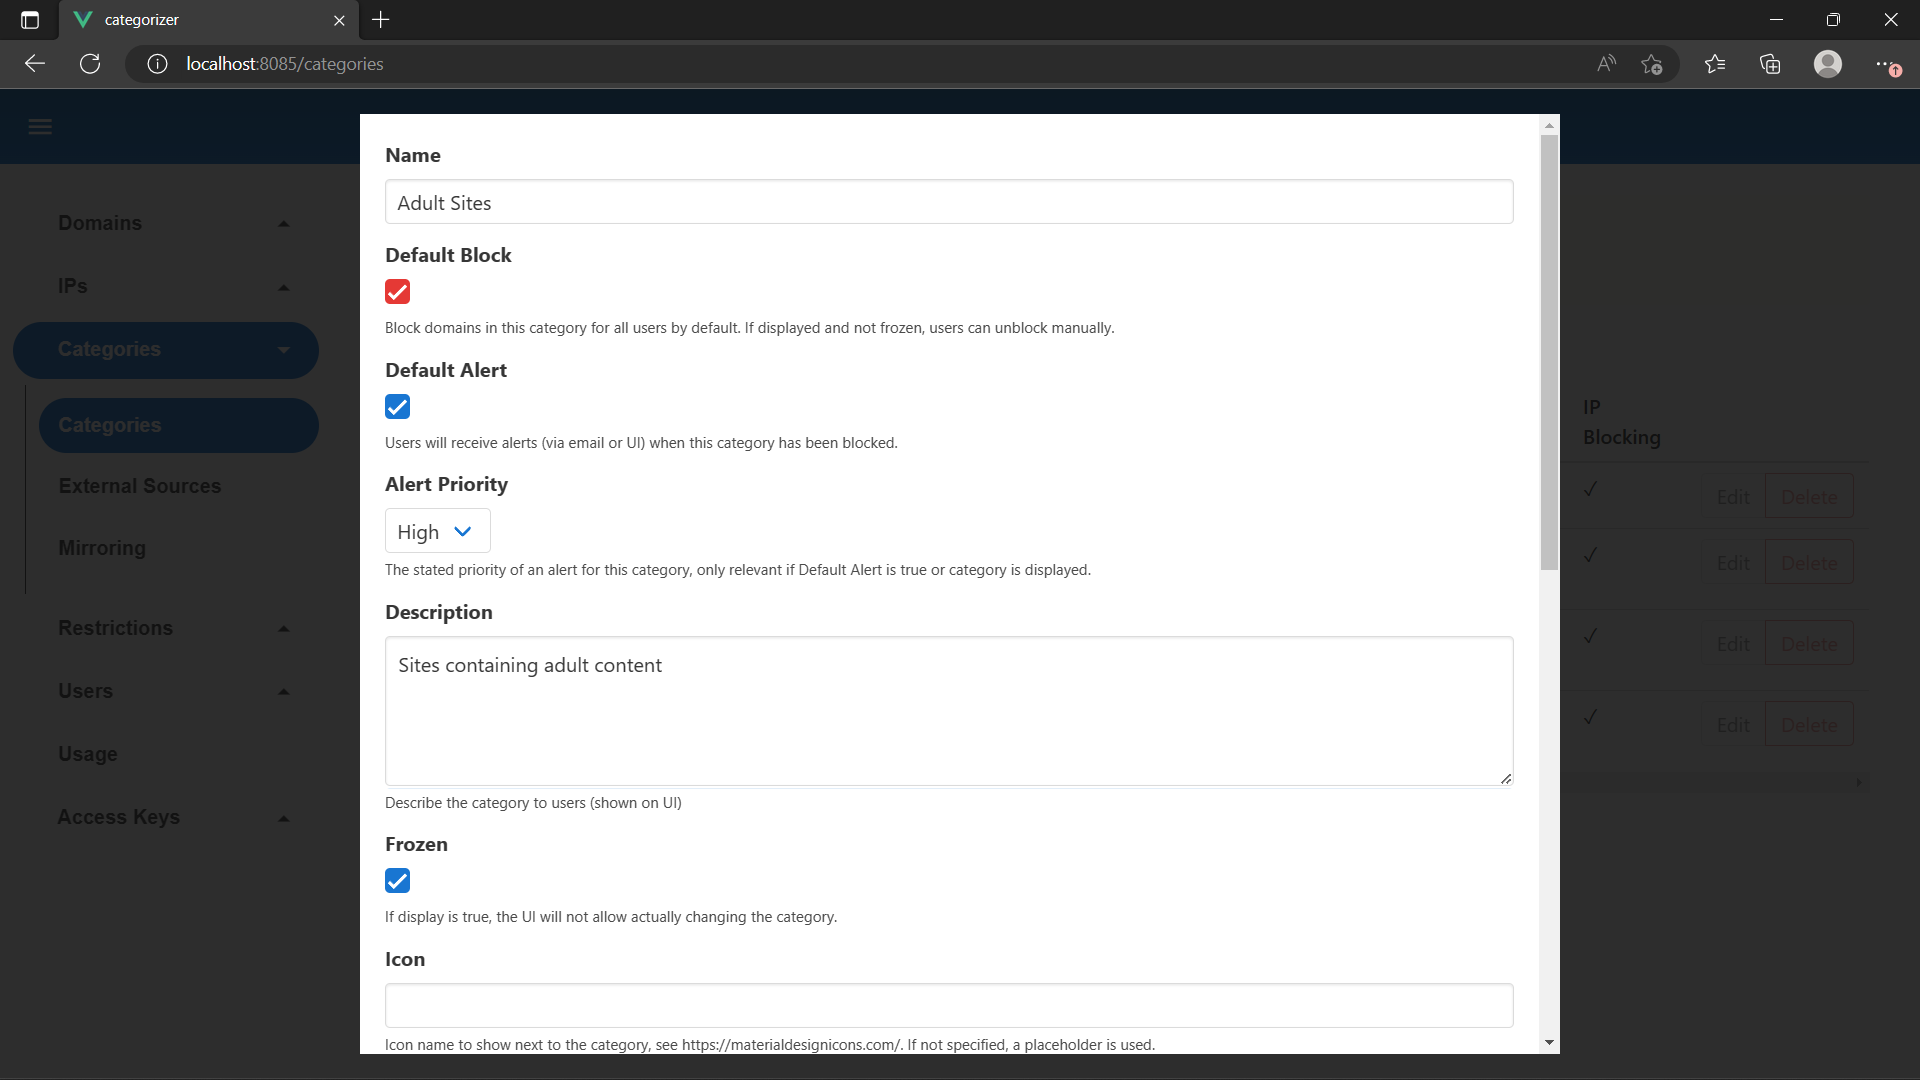
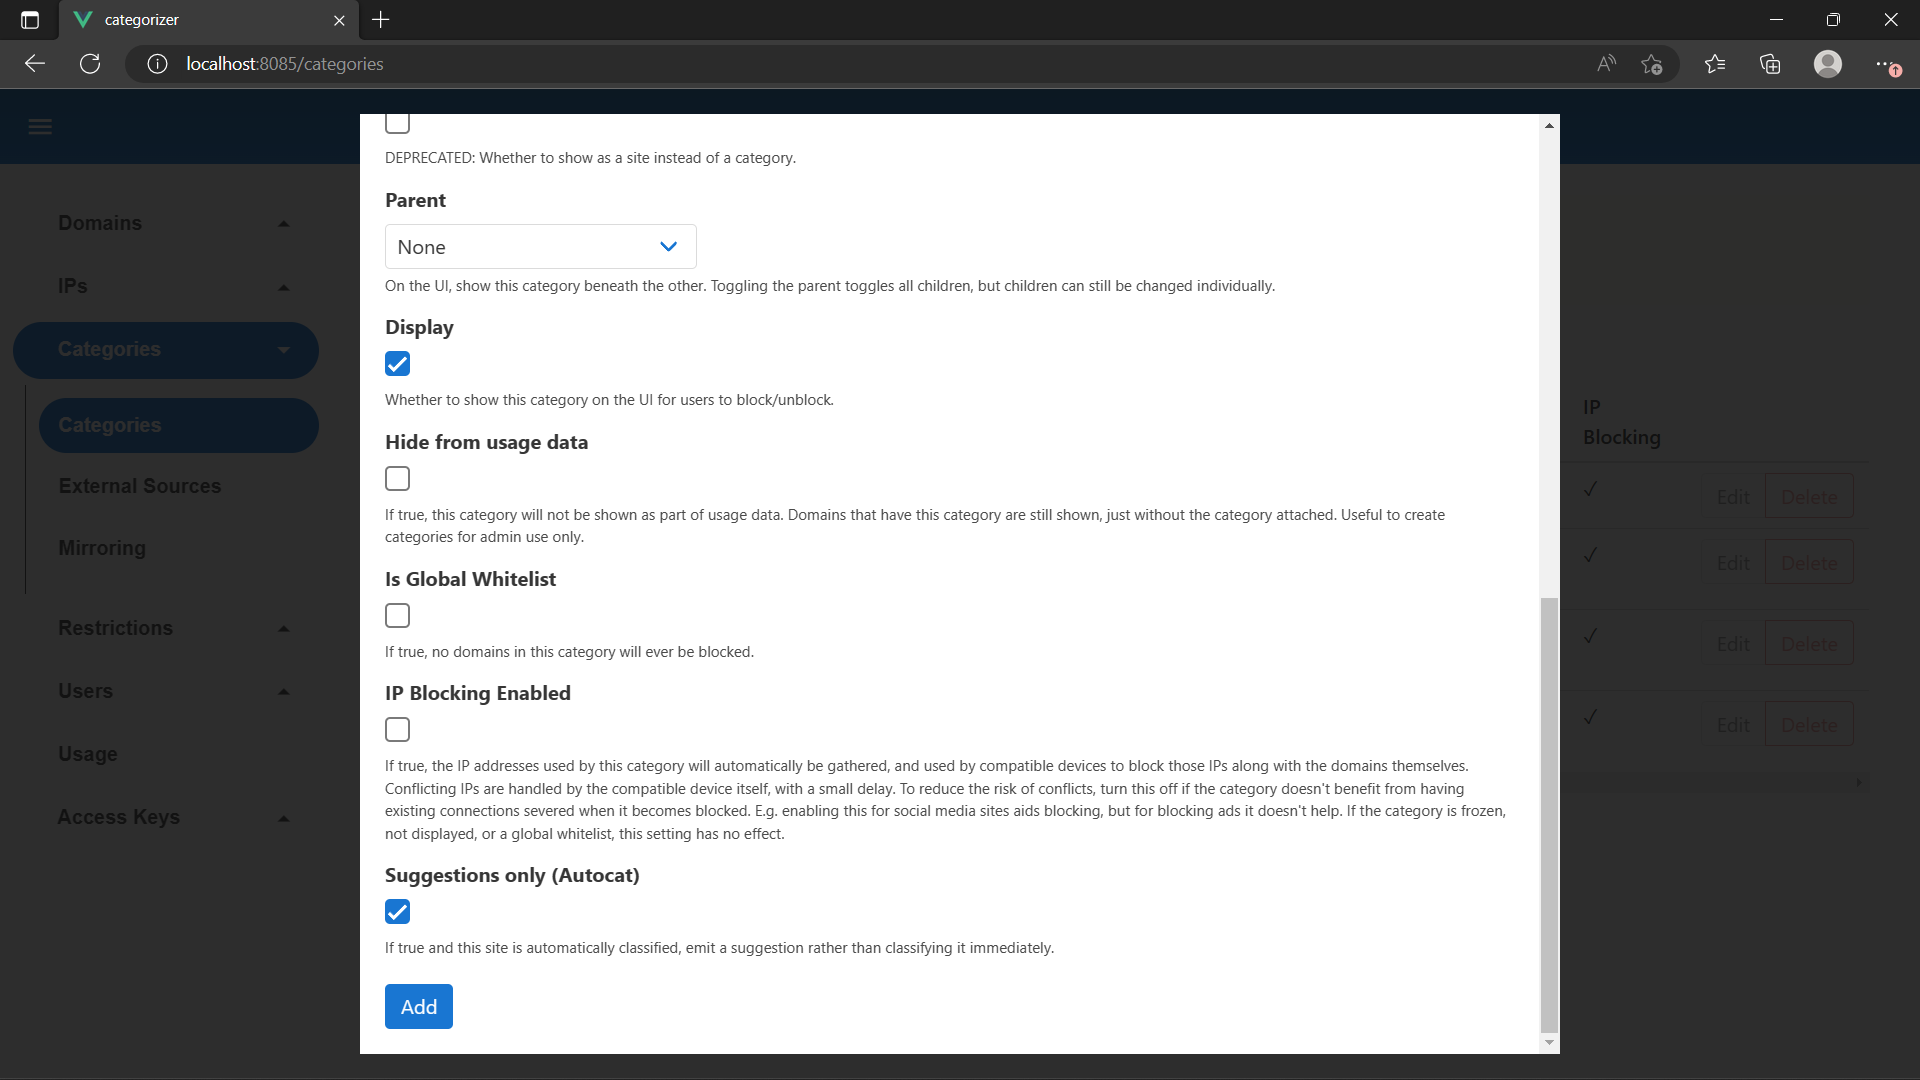
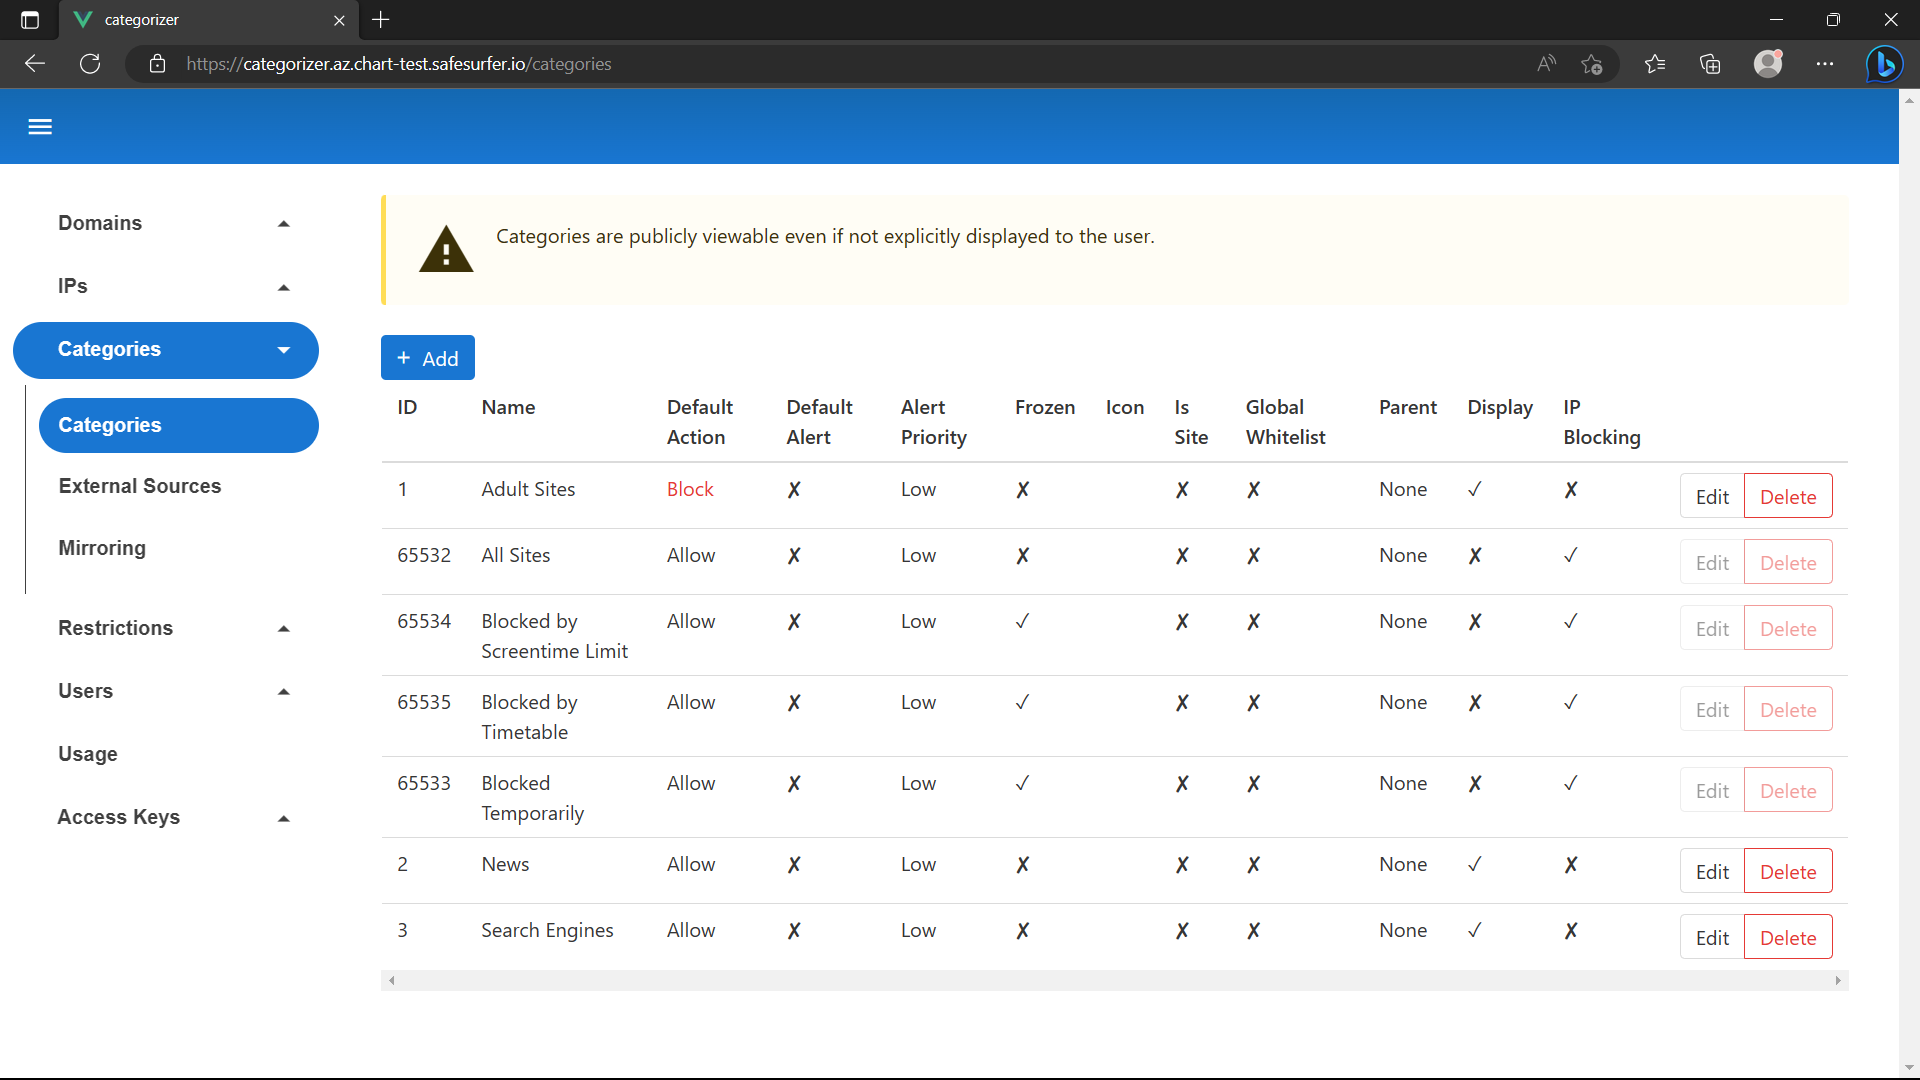
Select Add. Ensure you Display the category. Now add two more categories named News and Search Engines. You can leave all settings on their defaults for these, but Display them also. Your categories list should now look like this:
Now let’s add some domains to the categories. Navigate to the Domains -> Search page and search for exampleadultsite.com.
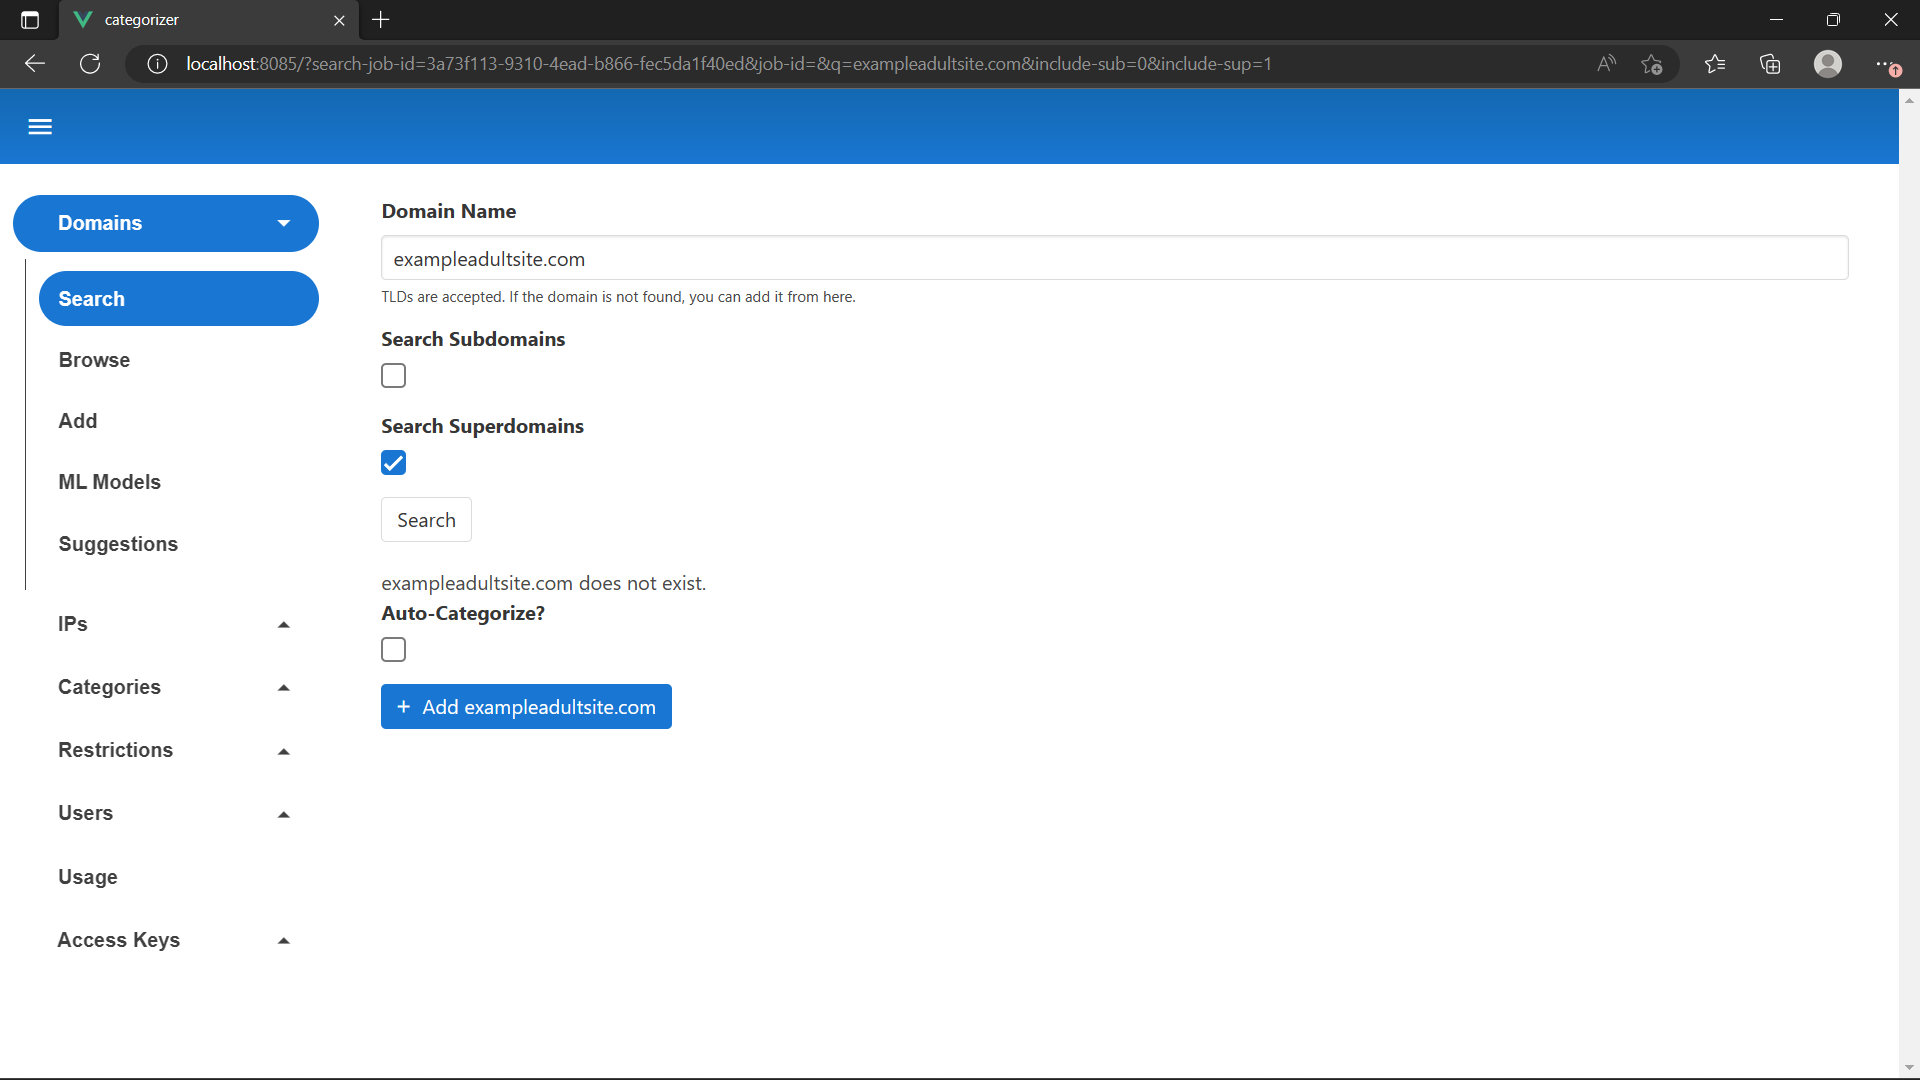
Leave Auto-Categorize unchecked since we haven’t set that up yet. Select Add exampleadultsite.com. Then select the domain name to edit it.
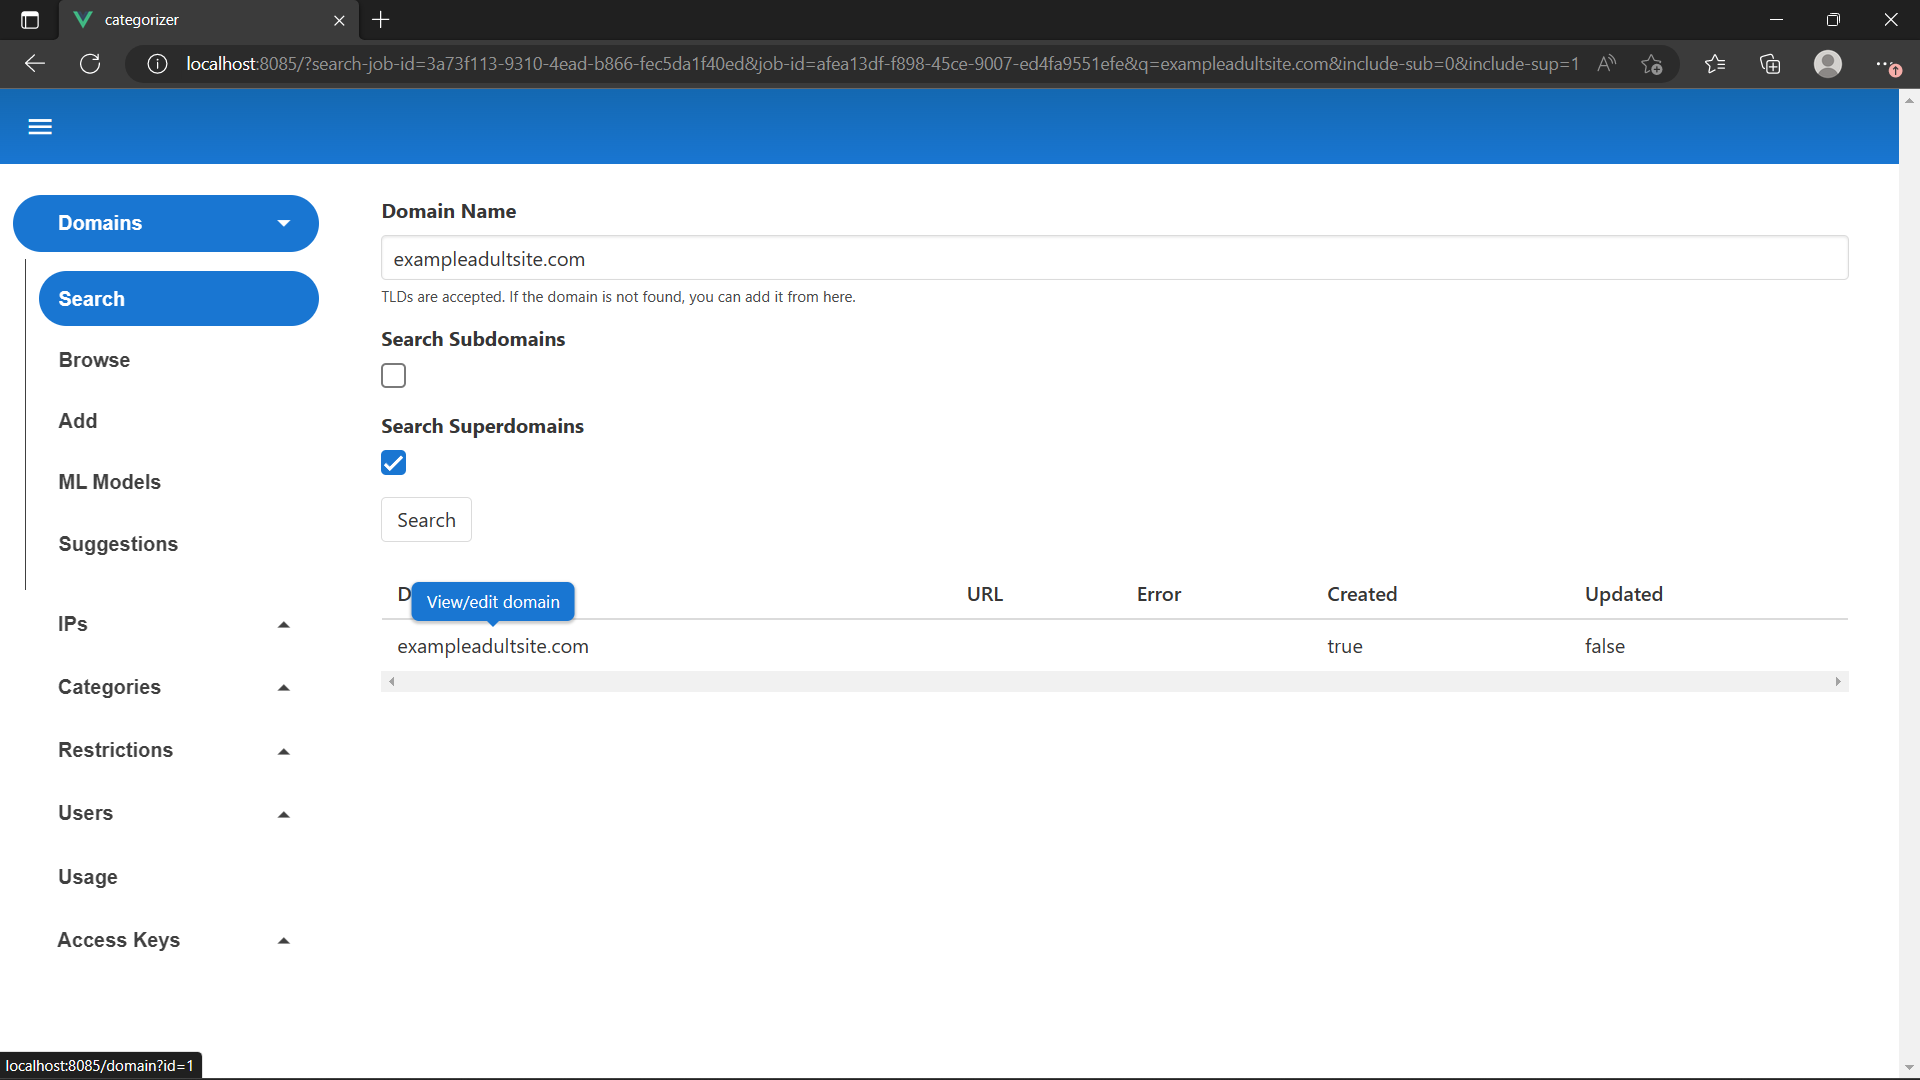
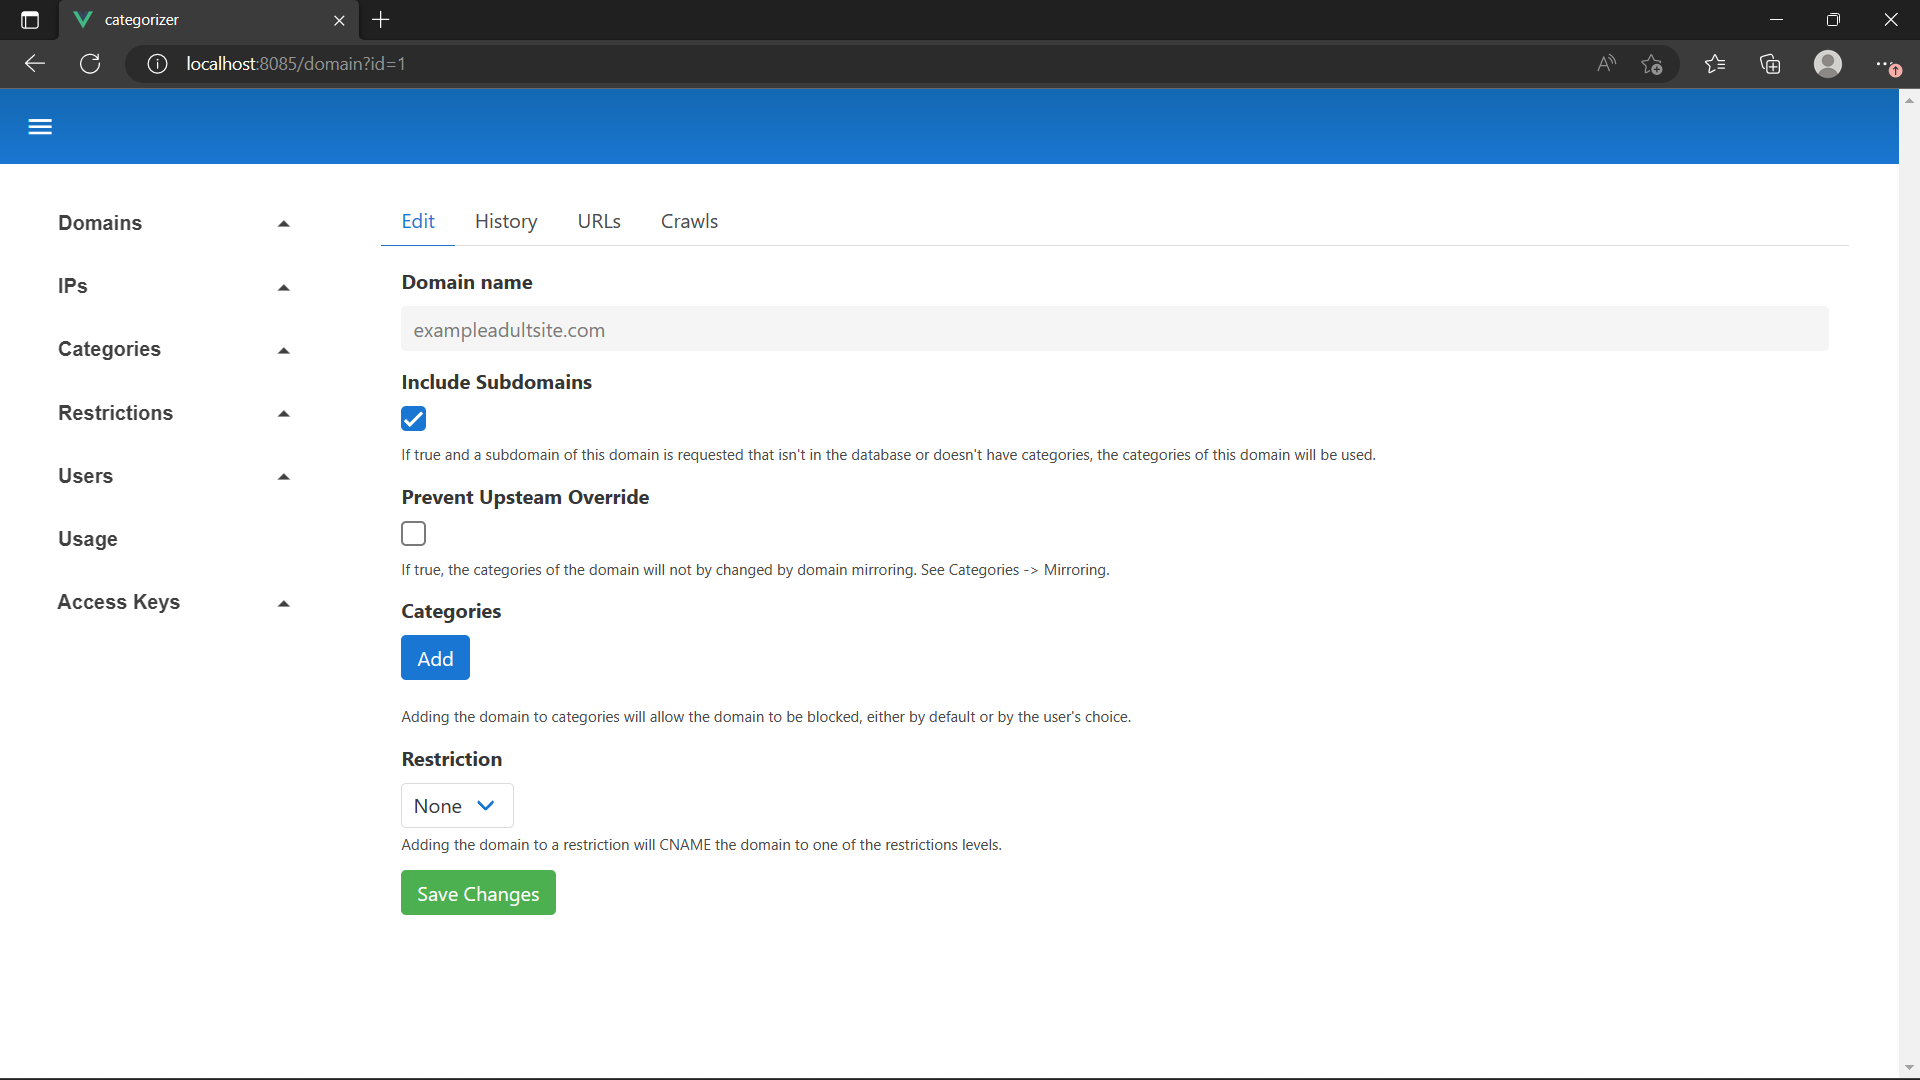
Now add the Adult Sites category to the domain and hit save.
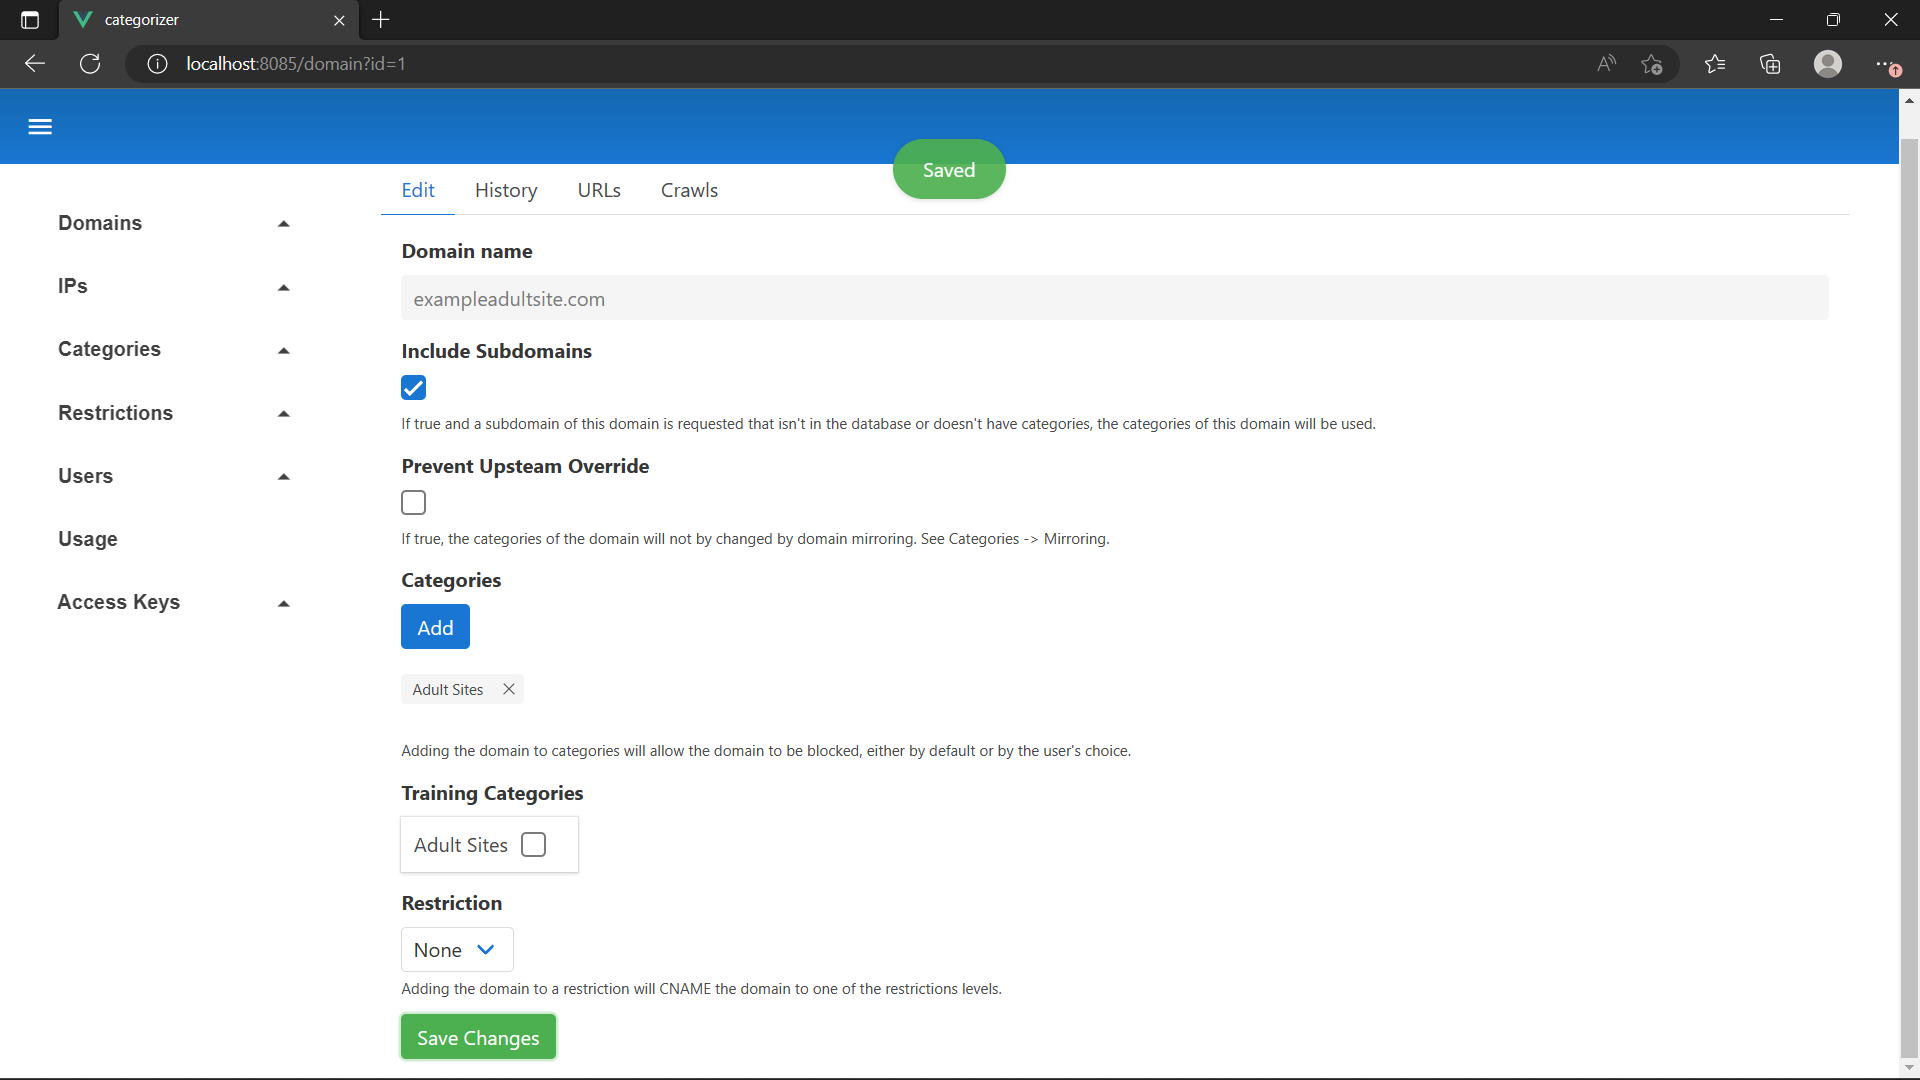
Repeat this process to add nytimes.com to the News category. Next, we will add a Restriction that enforces Safe Search on Google for everyone on the network. Navigate to the Restrictions -> Restrictions page and hit Add.
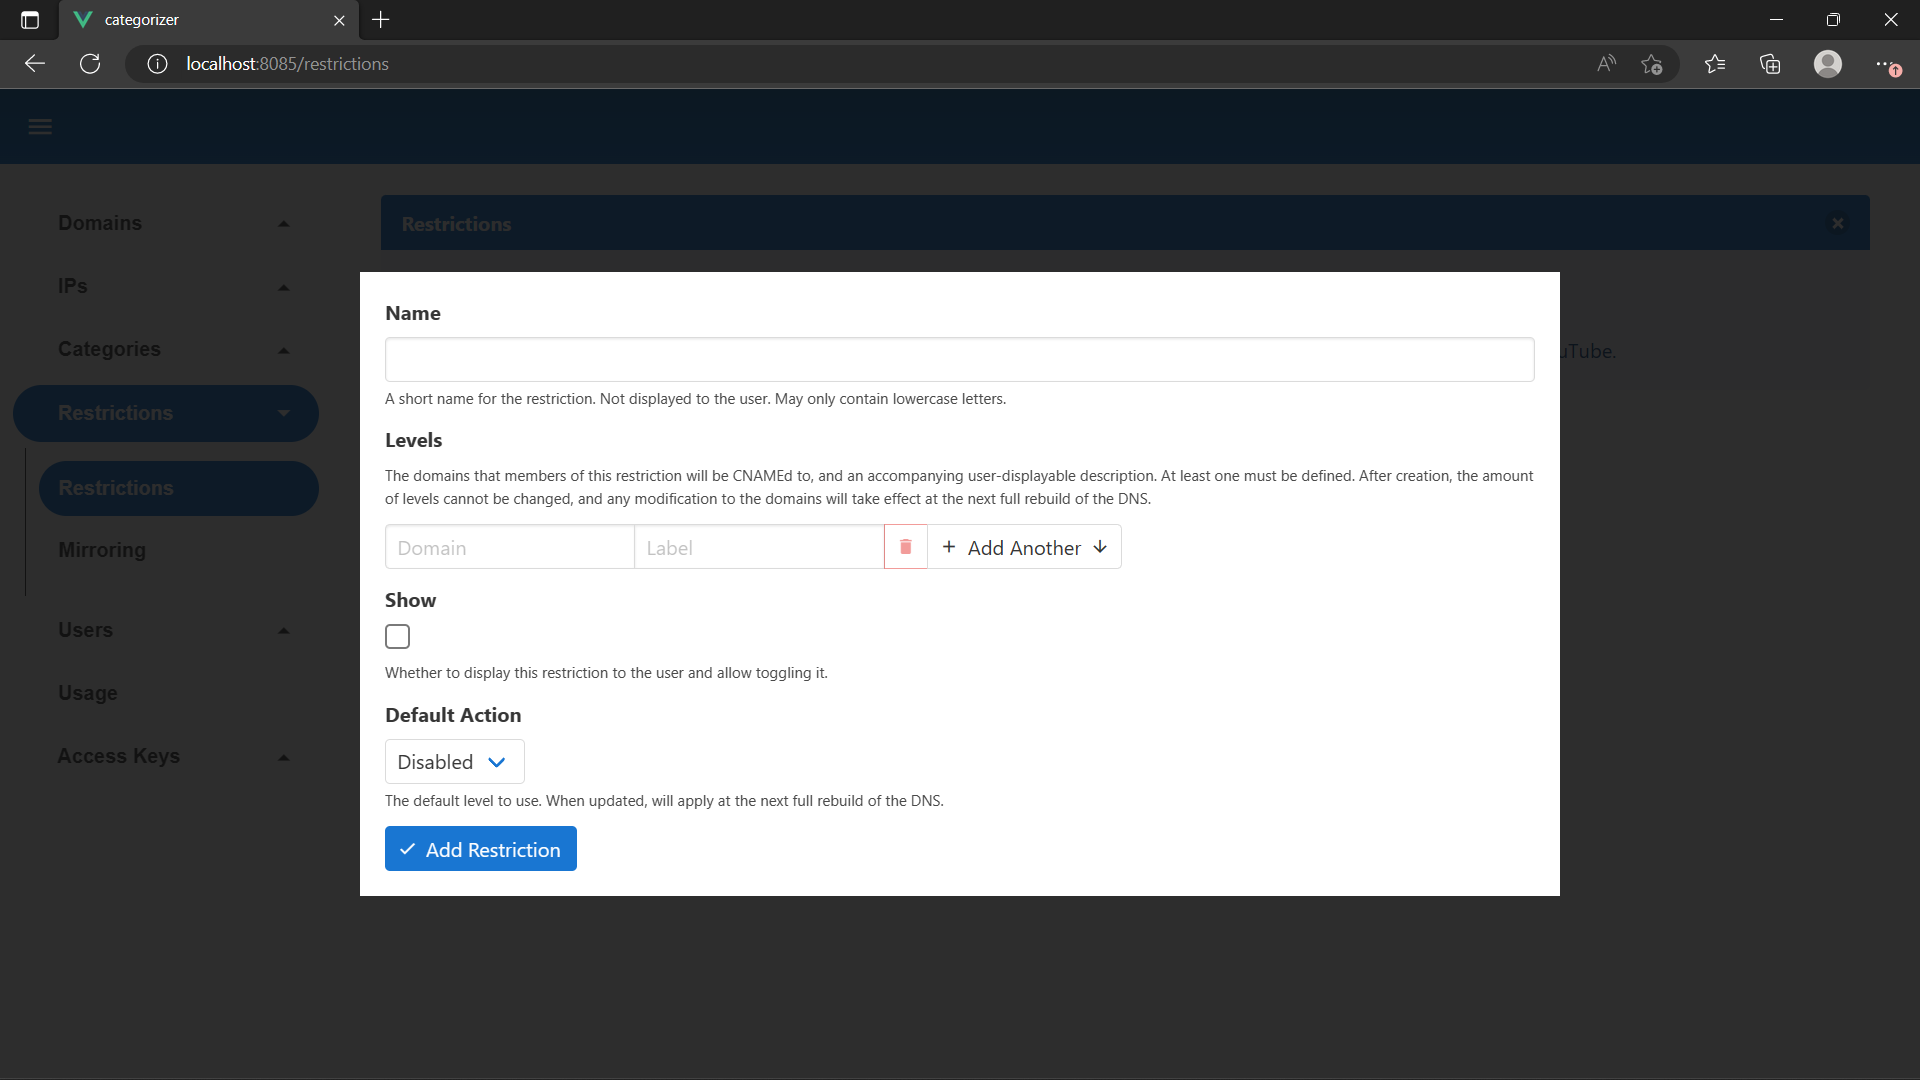
Enter the following details then hit Add Restriction. Note the cut off text under Levels is forcesafesearch.google.com.
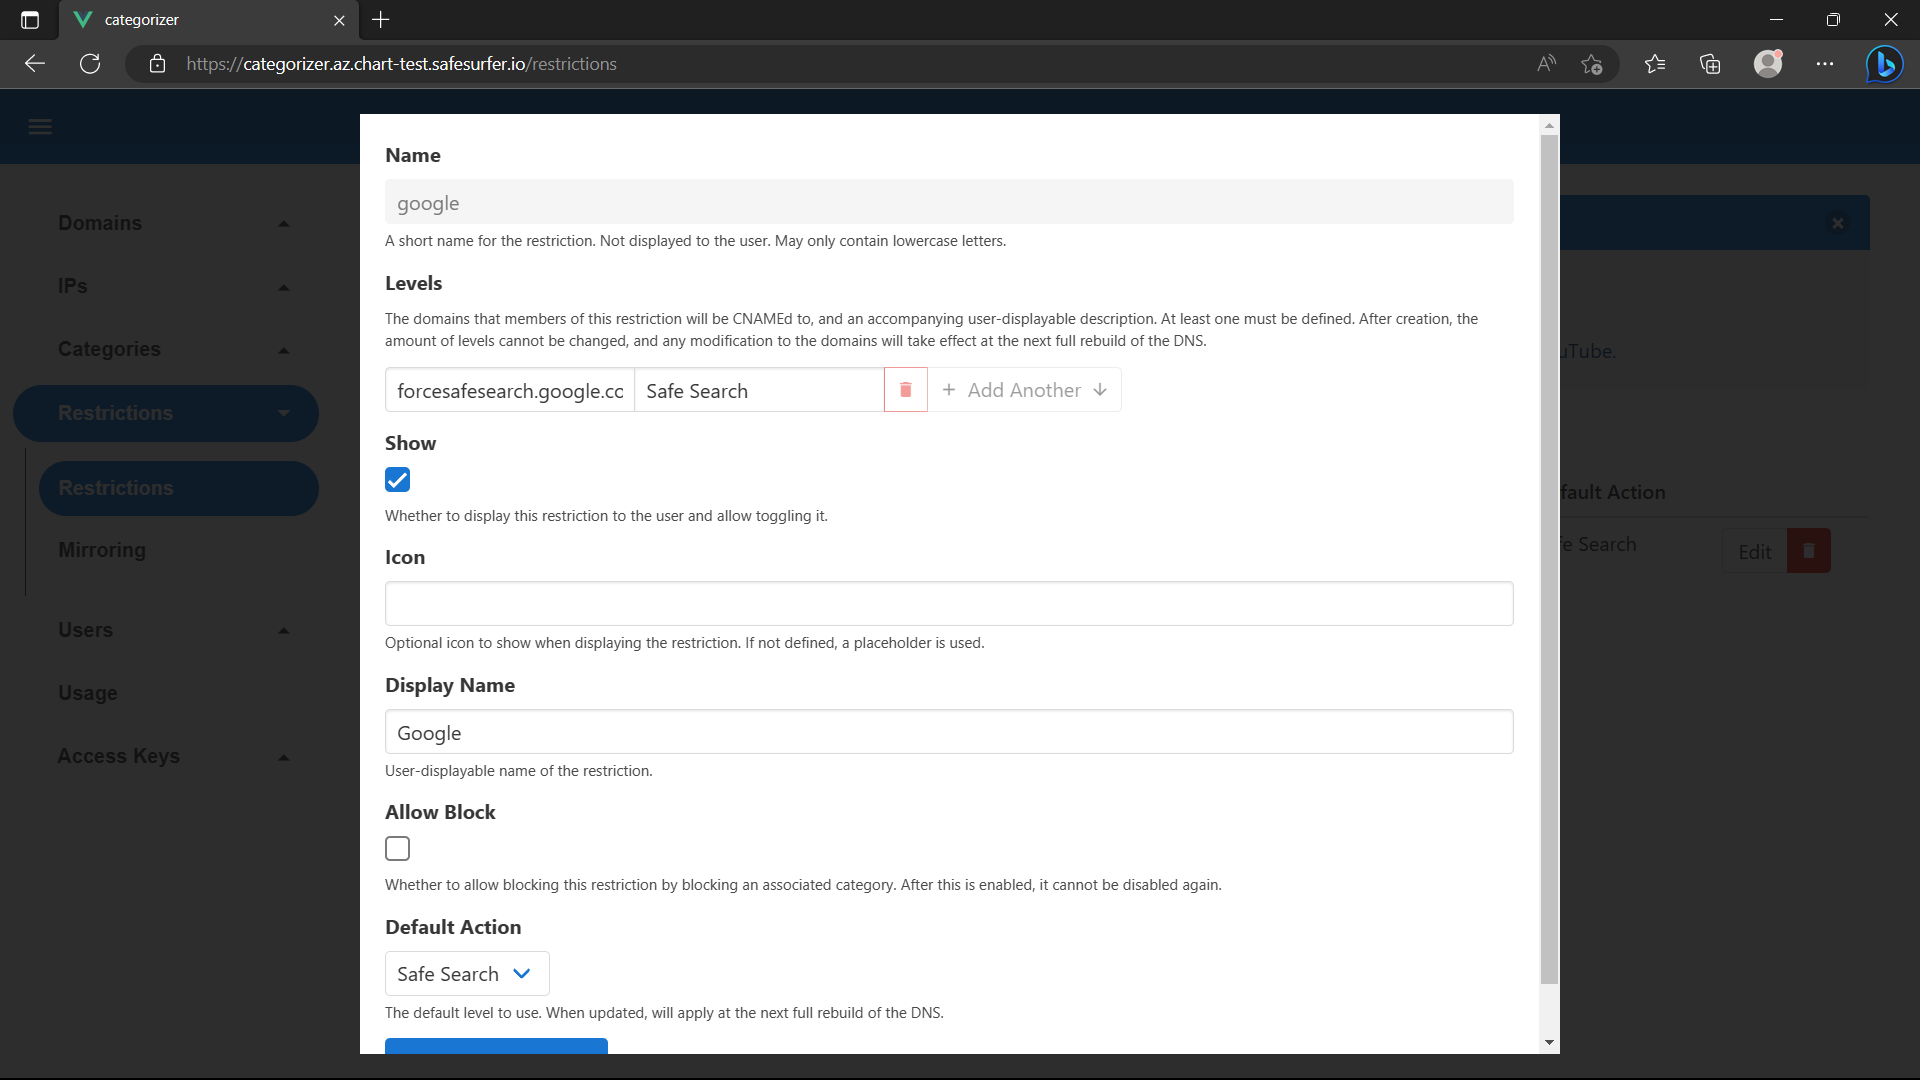
Now navigate to the Domains -> Add page. You can leave the settings at the top, but enter the following at the bottom:
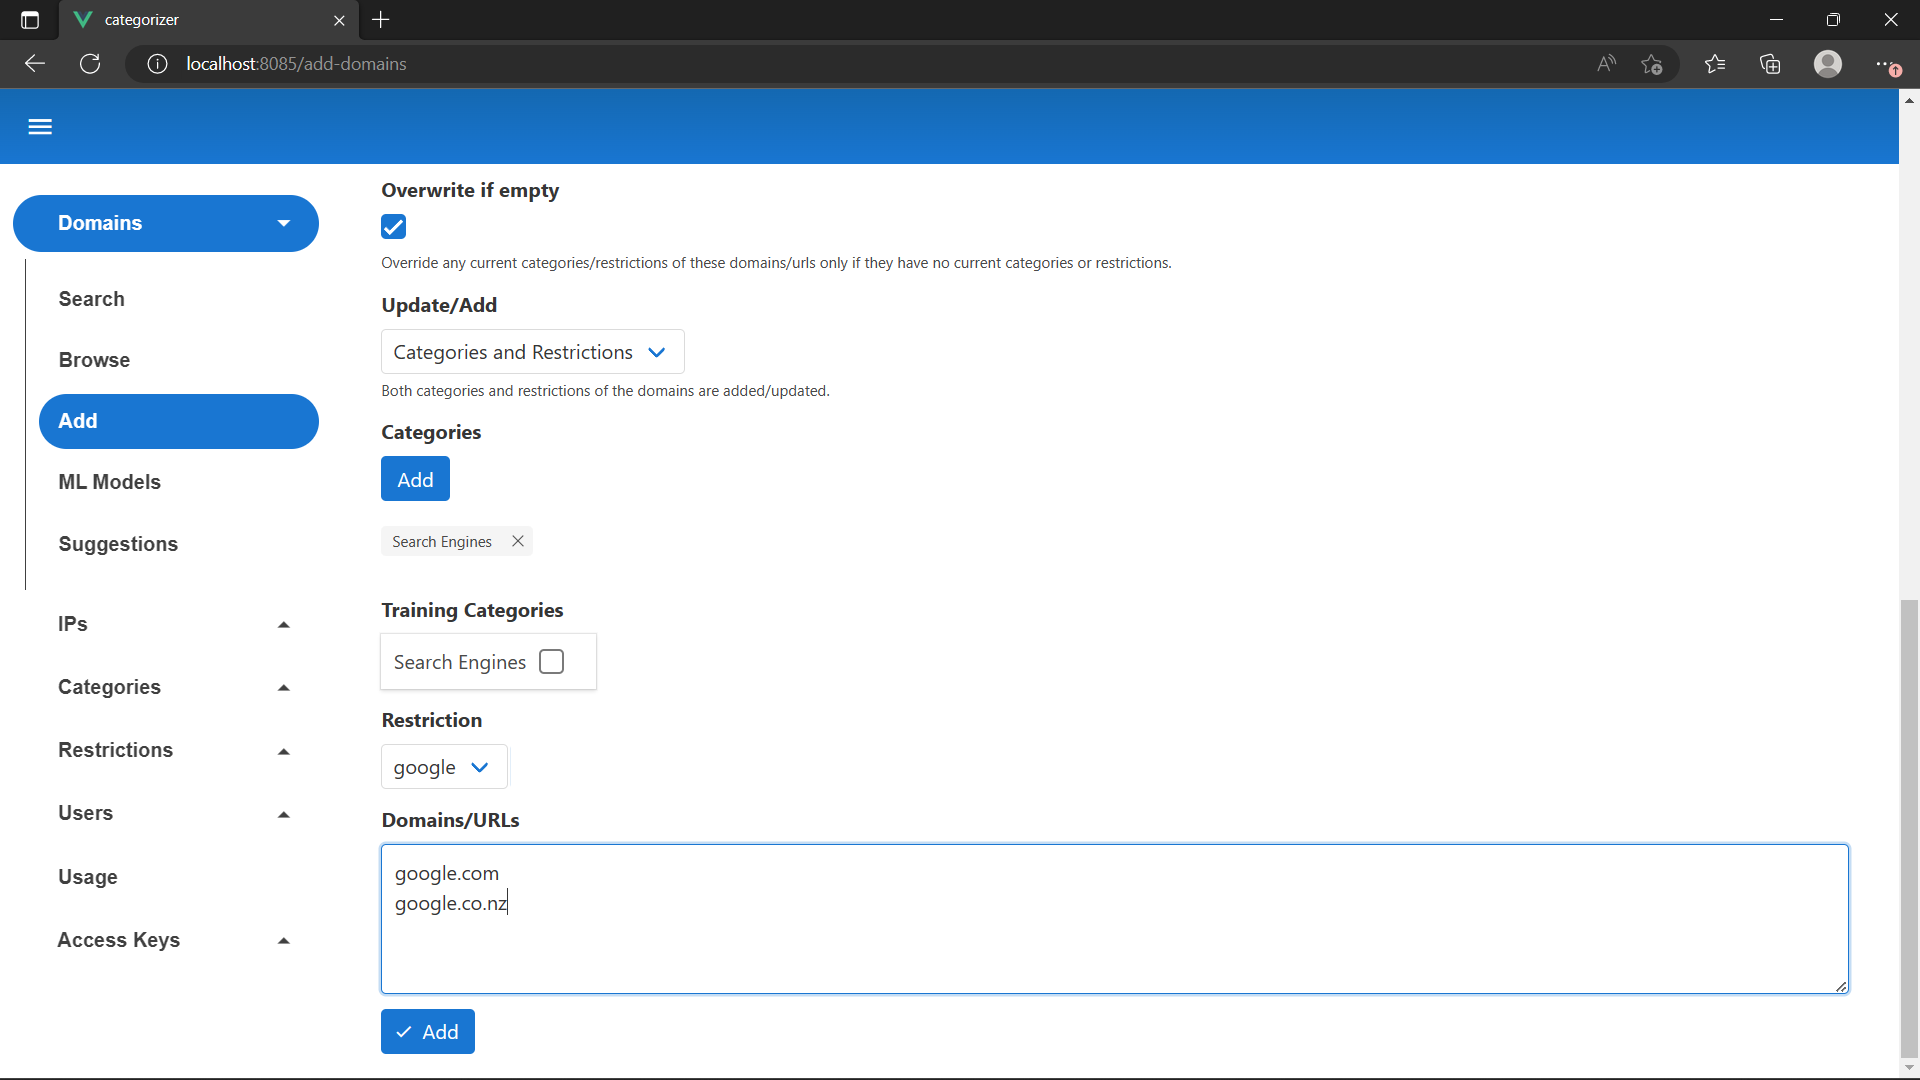
Now hit Add. You should see a result like the following:
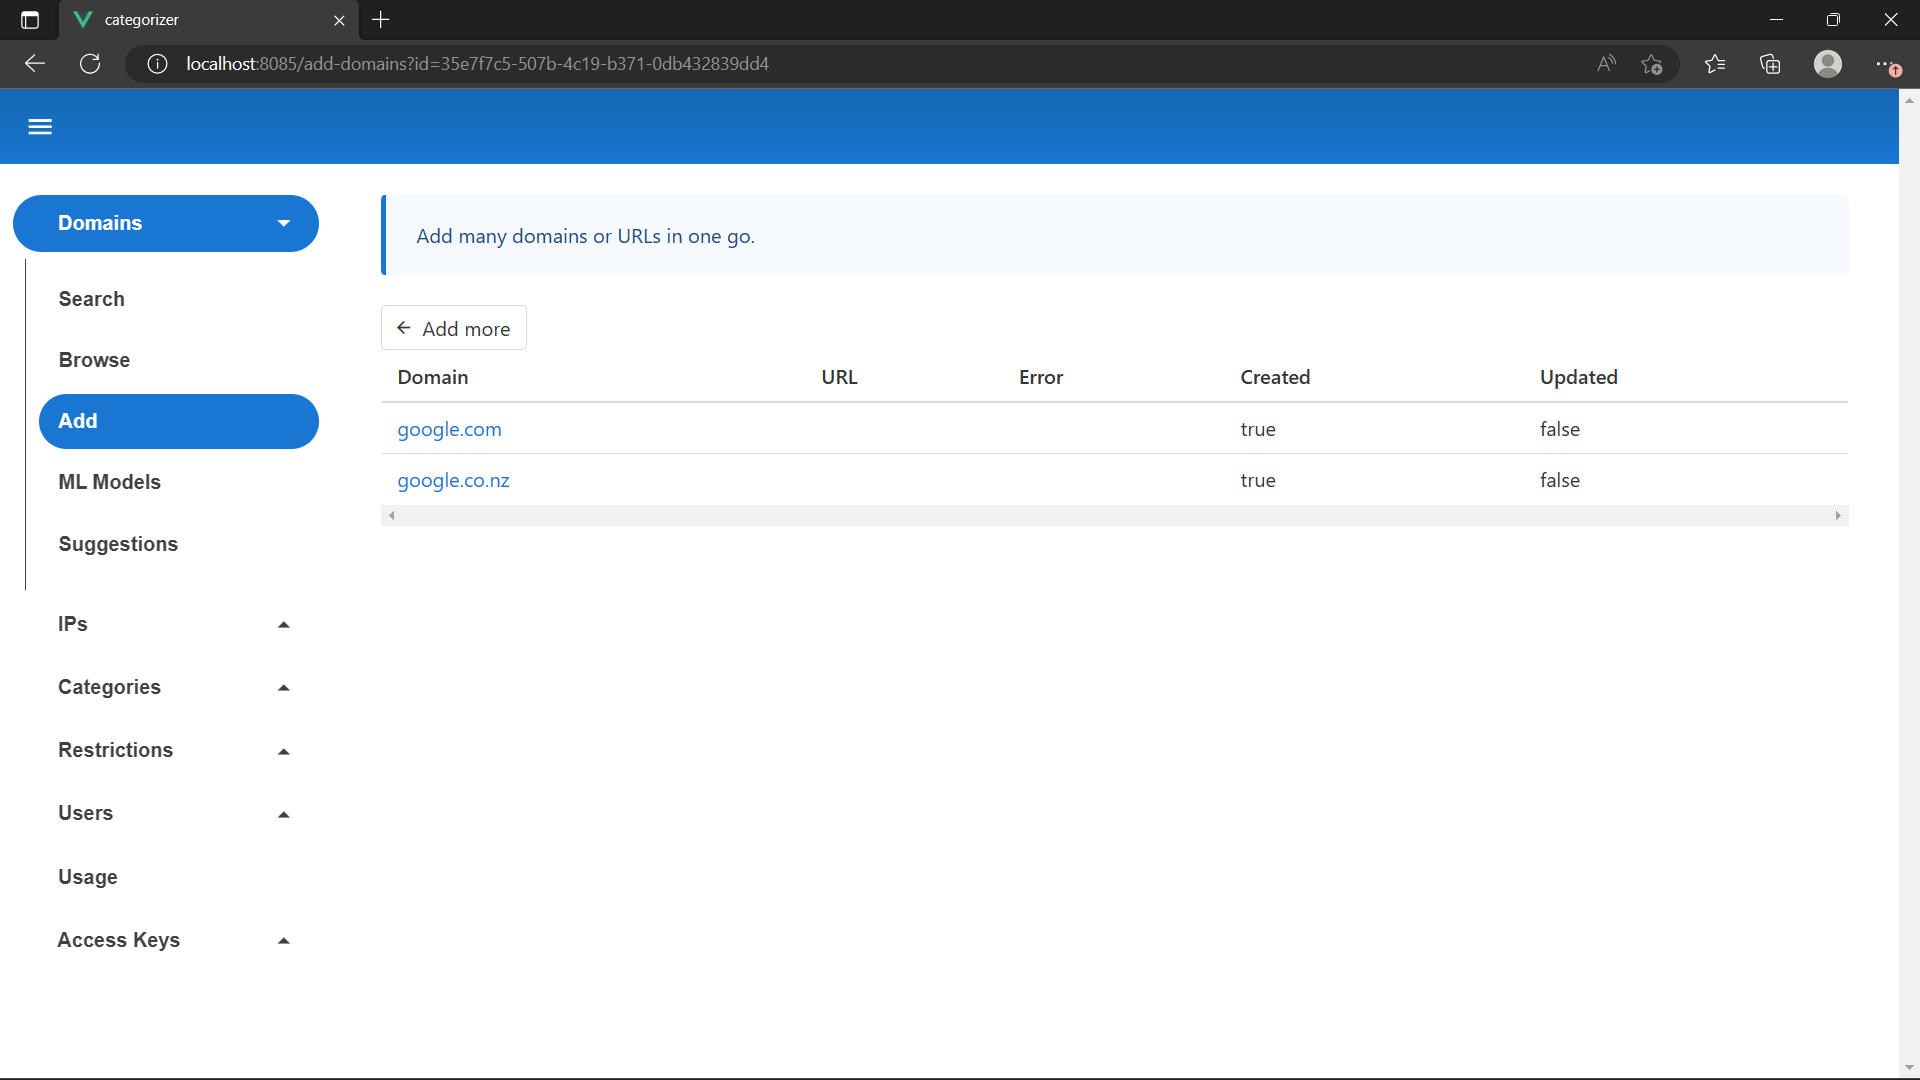
Note This is not the full list of Google Search domains. To get the full list, try enabling domain mirroring to sync from our database. This also includes domains for enforcing safe search on the other search engines and YouTube.
Now that we have some domains, we’re ready to deploy the DNS and see what it does.
Deploying the DNS
There are two ways of deploying the DNS: on kubernetes, and on individual servers using the ss-config tool. You can complete one or both of the sections below to get an idea. There are also two ways of connecting the DNS servers to postgres to load their local databases:
- Direct postgres connection.
- LMDB feed event source. Either can be used with either deployment method, and will be discussed more below.
K8s DNS
Unfortunately, it isn’t possible to create a load balancer with both UDP and TCP using the same IP on kubernetes. This means you can’t host plain DNS on kubernetes using a simple service. However, it is possible to convert each kubernetes node into its own DNS server using host networking. Later on, you can host Plain DNS, DOH, and DOT on the same IP using this approach. Add the following to your values.yaml:
dns:
  enabled: true
  dns:
    enabled: true
    hostNetwork: true
    replicas: 1
    # Tone resources down for testing
    resources:
      requests:
        memory: "128Mi"
        cpu: "100m"
    initContainers:
      iptablesProvisioner:
        enabled: true
      initLmdb:
        # Tone resources down for testing
        resources:
          requests:
            memory: "128Mi"
            cpu: "100m"
          limits:
            memory: "128Mi"
            cpu: "200m"
    sidecarContainers:
      lmdbManager:
        # Tone resources down for testing
        resources:
          requests:
            memory: "128Mi"
            cpu: "100m"
          limits:
            memory: "128Mi"
            cpu: "200m"
      healthCheck:
        bindPort: 53531
        httpSecret:
          enabled: true
          secret: generate-a-strong-secret
Then, upgrade the release:
helm upgrade "safesurfer" "safesurfer/safesurfer" -f values.yaml
After running kubectl get pods you should now see something like this:
NAME                                        READY   STATUS        RESTARTS      AGE
safesurfer-dns-57b77b9978-nff8p             3/3     Running       0             26s
If you were quick enough, you may have seen the dns pod Initializing. This process should have been quick because our database
is small, but it can take a few minutes once your database is loaded with domains and/or users. During the Initializing phase, the DNS loads its own local database, meaning your DNS speed and/or uptime isn’t tied to your postgres database. It will live-update after this. The postgres database can even go down completely without impacting internet access. However, users or admins will not be able to change settings while there is database downtime.
Now that our DNS is running, we need to make it available to the internet. Since we’re running host networking, we’ll have to create a load balancer that points to the node pool of kubernetes itself. The way to do this depends on how you’ve deployed Safe Surfer.
- On Azure, the node pool is implemented as a VM scale set. Create a new public IP address in the infrastructure resource group for the k8s cluster. Keep in mind that deleting the cluster will delete this IP. Then add another health check to the existing kubernetes load balancer (see below) as well as two new load balancing rules. The load balancing rules should be
UDP/53 to UDP/53530andTCP/53 to TCP/53530on the IP address you created. Then, on the VM scale set, allow inbound traffic to53530in the firewall rules. - On GCP, you can create a new load balancer, there is no need to use the existing one. Reserve a new public IP and forward
UDP/53 to UDP/53530andTCP/53 to TCP/53530. Select the kubernetes node pool as the backend. Allow inbound traffic to53530in the firewall rules. Create a new HTTP health check as shown below. - When testing locally with minikube/kind, you can run the following command in a separate termainal to access the DNS:
kubectl port-forward svc/safesurfer-dns-internal 5353:53. You can now query the DNS on127.0.0.1:5353.
Health Check
The health check ensures that DNS traffic is only directed to nodes that are actually running a healthy DNS pod. It should be a HTTP health check on port 53531 of the node pool with the path /healthy?target=dns&secret=generate-a-strong-secret. The secret should match what you specified in your values.yaml. You must be careful with the interval and timeout of your health check. When a DNS pod receives the signal to terminate (as may occur during a normal rollout), it will keep running for dns.dns.terminationWaitPeriodSeconds (30 by default). During this period, any health checks will return a non-2xx status code to allow traffic to be directed away from the pod before it terminates. So you must ensure that your health check will fail within terminationWaitPeriodSeconds, even if the DNS pod starts terminating right after the most recent health check succeeds.
Other considerations for production
- Ensure that each node has its own public IP, otherwise you will be using NAT for outbound traffic, which is a performance bottleneck for DNS.
- Configure
dns.dns.hpaanddns.dns.pdbfor autoscaling according to your needs. - If your cluster is also hosting other services, you may wish to make the DNS its own node pool using node taints and point the load balancer towards that. You can then use
dns.nodeSelectoranddns.tolerationsto ensure that node pool only hosts the DNS. For example, if you made a node pool nameddns-1with the taintNoSchedule: ss-role=dns, then you could use the following in yourvaluesto only schedule on that pool: ```yaml dns: nodeSelector: # This differs based on platform. # Check your node labels to find a matching value, e.g. # kubectl get node my-dns-node -o=jsonpath=’{.metadata.labels}’ | jq cloud.google.com/gke-nodepool: dns-1Allow the DNS to schedule on the tainted node pool
tolerations:
- key: ss-role operator: Equal value: dns effect: NoSchedule ```
Switching to LMDB feed
LMDB feed is an event source that the DNS containers can connect to instead of a direct postgres connection. This has several benefits:
- Reduced overhead on each DNS instance, especially with large amounts of customers and/or domains.
- Can scale up and down during database downtime, for example in the case of a multi-faceted DDOS attack.
- Faster initialization phase.
- Reduced load on postgres, and theoretically infinite scaling, whereas postgres is limited by the amount of connections.
- Improved security if deploying DNS servers outside of the kubernetes cluster containing the rest of the deployment.
To enable LMDB feed, add the following to the values.yaml:
dns:
  lmdbFeed:
    default:
      enabled: true
      clientConfig: |-
        dns:
          password: generate-a-lmdb-feed-password
Then also modify the DNS containers to connect to LMDB feed:
dns:
  dns:
    initContainers:
      initLmdb:
        backend:
          lmdbFeed:
            enabled: true
            internal:
              username: dns
          postgres:
            enabled: false
    sidecarContainers:
      lmdbManager:
        backend:
          lmdbFeed:
            enabled: true
            internal:
              username: dns
          postgres:
            enabled: false
Then upgrade the deployment.
To improve the availability of updates, you can also enable persistence. This allows LMDB feed to pick up where it left off when restarted. Otherwise, it has to fully rebuild when started:
dns:
  lmdbFeed:
    default:
      persistence:
        enabled: true
        storageClassName: default
Server DNS
The DNS can run on any linux OS supporting systemd and docker. The ss-config tool can template configuration files or a cloud-init file to install Safe Surfer DNS on any operating system. It takes input in the same values.yaml format as the helm chart, but does not support all the parameters, for example autoscaling must be handled differently for server deployments.
Warning The configuration produced by
ss-configassumes a fresh system - it makes several changes to the system configuration as necessary, such as disablingsystemd-resolved, enabling other services, and overwriting docker config.
ss-config is distributed as a simple binary - you can download it for your system here.
Rename the binary to ss-config, ensure it has execute permissions, and move it to your path. Alternatively you can use it directly from the download location.
To see all values supported by ss-config, run ss-config values. For this example, we’ll assume you’re working in a file named server-values.yaml in the current directory. The contents of server-values.yaml override the defaults shown by running ss-config values.
To start with, copy your existing image pull secret:
imagePullSecret:
  username:
  password:
Then, add database connection details:
db:
  external:
    pguser: safesurfer
    pgpassword: safesurfer
    pghost: 10.10.10.10
    pgdb: safesurfer
    pgsslmode: require
If you’re connecting to an internal database from your kubernetes deployment, you can adapt the following snippet into your values.yaml to create a database load balancer restricted by source IP. Then you can use the newly created service IP to connect from your server.
db:
  inCluster:
    extraSpec:
      enableMasterPoolerLoadBalancer : true
      # Uncomment allowedSourceRanges if your DNS servers won't share an internal network with the kubernetes cluster
      # hosting your internal database.
      # allowedSourceRanges:
      # # Change the below to the source IP of your server(s). Ensure they are in CIDR syntax.
      # - 10.10.10.10/32
      # Uncomment serviceAnnotations to create an internal load balancer to DNS servers to use.
      # serviceAnnotations:
      #   # Configure the below to create an internal load balancer for your platform
      #   networking.gke.io/load-balancer-type: "Internal"
      #   networking.gke.io/internal-load-balancer-allow-global-access: "true"
      #   service.beta.kubernetes.io/azure-load-balancer-internal: "true"
Then, configure the DNS:
dns:
  dns:
    sidecarContainers:
      lmdbManager:
        backend:
          lmdbFeed:
            enabled: false
          postgres:
            enabled: true
      healthCheck:
        enabled: true
        httpSecret:
          enabled: true
          secret: generate-a-strong-secret
        useFallbackRoute: true
    initContainers:
      initLmdb:
        backend:
          lmdbFeed:
            enabled: false
          postgres:
            enabled: true
blockpage:
  # We'll deploy the block page later
  domain: ''
protocolchecker:
  # We'll deploy the protocol checker later
  domains:
    base: 'active.check.ss.example.com'
Now we can use the ss-config tool to generate the installation files. Just run ss-config template -f server-values.yaml, which if successful shouldn’t print anything to the console. There should now be a vm-config folder in your working directory. Inside the vm-config should be two items:
- A
cloud-init.yamlfile, which will automatically create the desired files when provided to any VM creation process that supports cloud-init. - An
etcfolder, which can be copied to the root directory of the server manually.
After transferring the files to the server using either method, navigate to the /etc/safesurfer directory. You should see a set of files that look like this:
dns init.sh status
Ensure init.sh has execute permissions:
sudo chmod +x init.sh
Run init.sh:
sudo ./init.sh
The script should guide you through the installation process from here. As mentioned, when done, you can choose to make an image of the disk at this point or reboot to test now. After rebooting, the disk will no longer be suitable for creating an image, because it will contain data which may be out of date by the time you deploy the image.
Regardless of the option you choose, after booting (or rebooting) a DNS server, you can check its status by running sudo docker ps. You should see a result like the following:
CONTAINER ID   IMAGE                                                          COMMAND                  CREATED         STATUS                  PORTS     NAMES
beb13c45b9de   registry.gitlab.com/safesurfer/core/apps/status:1.1.1          "/app/status-exec"       1 second ago    Up Less than a second             ss-status
dfd035fb952f   registry.gitlab.com/safesurfer/core/apps/dns:1.16.0            "/app/run-server.sh"     6 seconds ago   Up 5 seconds                      ss-dns
43a6b21886ab   registry.gitlab.com/safesurfer/core/apps/lmdb-manager:1.16.2   "/app/lmdb-manager-e…"   7 seconds ago   Up 5 seconds                      ss-lmdb-manager
If you were quick enough, you might have seen the init container running instead. This process should have been quick because our database is small, but it can take a few minutes once your database is loaded with domains and/or users. During the init phase, the DNS loads its own local database, meaning your DNS speed and/or uptime isn’t tied to your postgres database. It will live-update after this. The postgres database can even go down completely without impacting internet access. However, users or admins will not be able to change settings while there is database downtime.
Switching to LMDB feed
Like the kubernetes DNS, the server DNS can connect to LMDB feed instead of postgres directly. The other Switching to LMDB feed section above explains how to deploy LMDB feed itself. The way you expose the feed to your DNS servers depends on your configuration.
If the servers are within the same internal network as the cluster, you may like to use an internal load balancer, for example:
# In K8s values.yaml
dns:
  lmdbFeed:
    default:
      service:
        type: LoadBalancer
        annotations:
          # Annotations to create an internal load balancer, which depends on your platform
          # networking.gke.io/load-balancer-type: "Internal"
          # networking.gke.io/internal-load-balancer-allow-global-access: "true"
# In ss-config values.yaml
dns:
  dns:
    sidecarContainers:
      lmdbManager:
        backend:
          lmdbFeed:
            enabled: true
            external:
              host: # The IP created
              username: dns
              password: generate-a-lmdb-feed-password
              insecure: true
          postgres:
            enabled: false
    initContainers:
      initLmdb:
        backend:
          lmdbFeed:
            enabled: true
            external:
              host: # The IP created
              username: dns
              password: generate-a-lmdb-feed-password
              insecure: true
          postgres:
            enabled: false
If the servers are hosted externally, you can expose LMDB feed using an ingress. Check out the ingress and cert setup guide, then adapt the following:
# In K8s values.yaml
dns:
  lmdbFeed:
    default:
      ingress:
        enabled: true
        host: lmdb-feed.ss.example.com
        tls:
          # See the ingress and cert guide
The DNS spec to connect to this externally would then look like this:
# In ss-config values.yaml
dns:
  dns:
    sidecarContainers:
      lmdbManager:
        backend:
          lmdbFeed:
            enabled: true
            external:
              host: 'lmdb-feed.ss.example.com:443'
              username: dns
              password: generate-a-lmdb-feed-password
              insecure: false
          postgres:
            enabled: false
    initContainers:
      initLmdb:
        backend:
          lmdbFeed:
            enabled: true
            external:
              host: 'lmdb-feed.ss.example.com:443'
              username: dns
              password: generate-a-lmdb-feed-password
              insecure: false
          postgres:
            enabled: false
If you are using autoscaling, you can improve performance and availability by enabling peering on the DNS servers. With peering enabled, DNS containers initialize using each other’s data, then seamlessly continue receiving live updates from the upstream feed. This enables:
- Autoscaling even if LMDB feed is unreachable.
- Reduced load on LMDB feed.
- Reduced data transfer between regions.
- Improved initialization speed.
When using the DNS inside kubernetes, peering is automatically configured. If using autoscaling server DNS, an internal load balancer must be created manually. The default port for peering is 9098, a health check should be created and use the TCP or GRPC protocol. Once that’s been created, the DNS containers can be instructed to use it like this:
# In ss-config values.yaml
dns:
  dns:
    initContainers:
      initLmdb:
        backend:
          lmdbFeed:
            peering:
              host: '10.10.10.10' # substitute with LB IP
Testing the DNS
Regardless of if you’ve set up the DNS on Kubernetes or Server(s), we can now query the DNS to see what it does. You can even switch your machine/network to your new DNS server to try it out.
Using the dig tool to query the DNS is recommended. It’s present (or installable) on most linux distros, and if you’re on Windows you can access it with WSL. Otherwise, you can use nslookup, but it doesn’t give as detailed responses.
First, create a variable containing the IP address your DNS is available on:
DNS_IP="10.10.10.10"
The DNS should be enforcing Safe Search on Google according to our earlier settings:
dig @$DNS_IP google.com
; <<>> DiG 9.18.1-1ubuntu1.2-Ubuntu <<>> @10.10.10.10 google.com
; (1 server found)
;; global options: +cmd
;; Got answer:
;; ->>HEADER<<- opcode: QUERY, status: NOERROR, id: 46357
;; flags: qr rd ra; QUERY: 1, ANSWER: 2, AUTHORITY: 0, ADDITIONAL: 1

;; OPT PSEUDOSECTION:
; EDNS: version: 0, flags:; udp: 512
;; QUESTION SECTION:
;google.com.                    IN      A

;; ANSWER SECTION:
google.com.             0       IN      CNAME   forcesafesearch.google.com.
forcesafesearch.google.com. 2004 IN     A       216.239.38.120

;; Query time: 240 msec
;; SERVER: 10.10.10.10#53(10.10.10.10) (UDP)
;; WHEN: Tue Mar 14 15:27:51 NZDT 2023
;; MSG SIZE  rcvd: 85
It should allow accessing a non-blocked site normally (also test TCP with this command):
dig @$DNS_IP nytimes.com +tcp
; <<>> DiG 9.18.1-1ubuntu1.2-Ubuntu <<>> @10.10.10.10 nytimes.com +tcp
; (1 server found)
;; global options: +cmd
;; Got answer:
;; ->>HEADER<<- opcode: QUERY, status: NOERROR, id: 25835
;; flags: qr rd ra; QUERY: 1, ANSWER: 4, AUTHORITY: 0, ADDITIONAL: 1

;; OPT PSEUDOSECTION:
; EDNS: version: 0, flags:; udp: 512
;; QUESTION SECTION:
;nytimes.com.                   IN      A

;; ANSWER SECTION:
nytimes.com.            94      IN      A       151.101.129.164
nytimes.com.            94      IN      A       151.101.193.164
nytimes.com.            94      IN      A       151.101.1.164
nytimes.com.            94      IN      A       151.101.65.164

;; Query time: 250 msec
;; SERVER: 10.10.10.10#53(10.10.10.10) (TCP)
;; WHEN: Tue Mar 14 15:31:12 NZDT 2023
;; MSG SIZE  rcvd: 104
Now what happens when we request a blocked site?
dig @$DNS_IP exampleadultsite.com
; <<>> DiG 9.18.1-1ubuntu1.2-Ubuntu <<>> @10.10.10.10 exampleadultsite.com
; (1 server found)
;; global options: +cmd
;; connection timed out; no servers could be reached
DNS resolution fails because we haven’t specified a domain to redirect to when a domain is blocked. This may be the behavior you want, but it isn’t recommended as users can confuse this for internet connection issues rather than blocking.
We will update this in one of the next sections - creating a block page.
Live Updates
Changes you make in the admin app will instantly sync to the DNS. You can play around more with the DNS at this point - adding new domains, categories, etc. and watch them update by requesting the DNS.
Next Steps
You’ve successfully created a filtering DNS server that uses static lists added through the admin app.
Try one of the next guides: